Epson Borderless Replacement Pad Kit C13S210102 SC-P7300 / SC-P9300 | SC-P7500 / SC-P9500 - Plot it Skip to Main Content

Welcome to the new Plot it website! Click here to reset your account password

Epson Borderless Replacement Pad Kit C13S210102 SC-P7300 / SC-P9300 | SC-P7500 / SC-P9500

What's Included

Contains replacement Borderless pads, gloves, tweezers & cleaning stick.

£47.99 inc VAT

£39.99 ex VAT

Quantity

Would you like to talk to a specialist about this product?

Epson
Epson SureColor SC-P7500 STD 24″ A1 Large Format Printer C11CH12301A1

Epson SureColor SC-P7500 STD 24″ A1 Large Format Printer C11CH12...

From

£2,938.80inc VAT

£2,449.00ex VAT

Epson
Epson SureColor SC-P7500 SPECTRO 24″ Large Format Printer C11CH12301A3

Epson SureColor SC-P7500 SPECTRO 24″ Large Format Printer C11CH1...

From

£4,679.94inc VAT

£3,899.95ex VAT

Epson
Epson SureColor SC-P9500 STD 44″ Large Format Printer C11CH13301A1

Epson SureColor SC-P9500 STD 44″ Large Format Printer C11CH13301...

From

£4,795.14inc VAT

£3,995.95ex VAT

Epson
Epson SureColor SC-P9500 SPECTRO 44″ A0 Large Format Printer C11CH13301A3

Epson SureColor SC-P9500 SPECTRO 44″ A0 Large Format Printer C11...

From

£6,955.14inc VAT

£5,795.95ex VAT

All you need to know about the Epson Borderless Replacement Pad Kit C13S210102 SC-P7300 / SC-P9300 | SC-P7500 / SC-P9500

Replacing the Borderless Pads

If you see ink smears on the back of your printouts, you may need to replace the pads for borderless printing. Only replace the borderless pads in the areas where you notice ink on your prints. You do not need to replace all of the borderless pads.

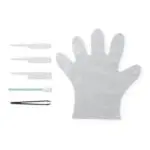
You need a Borderless Replacement Pad Kit  and a pair of tweezers to perform the replacement.


  1.  Turn off the product, wait for the LCD screen to turn off, and unplug the power cable from the electrical outlet.
  2.  Wait for one minute before continuing.
  3.  Open the front cover.
  4. Using tweezers, pull out the borderless pads in the areas where ink transfer occurs.
  5. Use the cleaning sticks to wipe off the accumulated ink as shown in the following locations:Bottom

    Sides

    Center groove

  6. Bend the leg on a new borderless pad as shown below.
    Note: Do not bend the borderless pad except at the area shown.
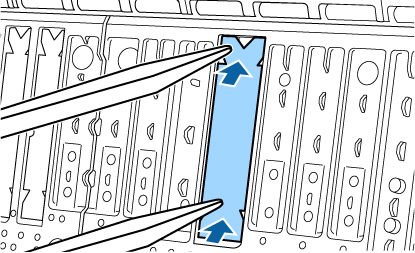
  7. Insert the leg of the borderless pad all the way into the hole as shown.
  8. Push the protrusions on the sides of the borderless pad into the grooves on the left and right.
  9. Gently press the borderless pad until it is seated in place.
    Caution:
    Make sure that no part of the borderless pad extends above the surrounding surface. The borderless pad may rub against the print head and damage it.

Sign up to our newsletter to get the latest news, special offers & exclusive deals.

Sign up
Trustpilot